From Liquidity Providers Settings tab you may set the settings for the liquidity providers you want to cover with.

You have to add at least one LP in order to start using the bridge. When you press right click on this window the following options will appear:
Connect:
To connect the selected LP.
Disconnect:
To disconnect the selected LP.
Edit:
Edit LP account information.

Symbols Mapping:
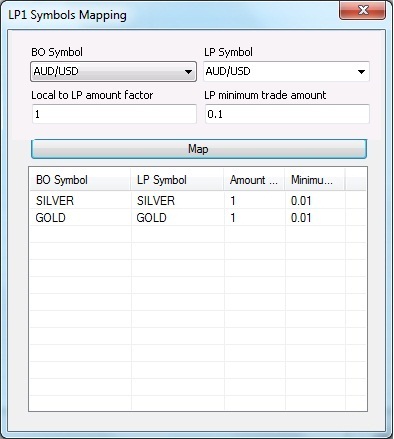
To map symbols between your VertexFX system (BO) and LP system. This means that when the bridge receives orders for instance SILVER, from your traders, the bridge will cover them with LP as orders of the mapped symbol with this LP. Note thatyou have to map all symbols with each LP, as the bridge will reject all non-mapped symbols orders.

- BO Symbol
Your VertexFX symbols. - LP Symbol
The LP’s symbols - Amount Factor:
The factor that the bridge will multiply the order amount with, before covering it with the LP. Mostly this value should be 1, but in some cases, for instance when your system is configured to trade as Lots, while the LP trades with direct amount, you should put the symbol’s contract size value as an Amount Factor, in order to reflect a correct order amount with this LP.
- Minimum Trade Amount:
Minimum acceptable amount that could be traded on this symbol with this LP. The bridge always rounds the result amount to this value multiplications before covering it with LP.
i.e. If you configured your bridge to cover 30% of orders’ amount on specific symbol, while you set the Minimum Trade Amount to be 1 for this symbol with this LP, and you receive order of amount 5.8 Lots, the bridge will compute the covered amount as follows:
30% * 5.8 = 1.74
Then the bridge will round the 1.74 to be of 1 multiplications, which finally = 2 lot.
If the amount of the percentage is 1.5 it will be rounded also to 2 lot, but if the percentage is 1.49 then it will be rounded to 1 lot.
- Map Button:
After choosing the right symbols and settings, press Map to save this mapping, It will be shown in the mapped symbols list, Right click on the symbol to de-Map it.
Accounts Mapping:
Select specific account(s) to cover its/ their orders with specific LP account. In normal Risk Management Bridge mode, this option is not used since coverage is performed into a single account for each LP which is defined once in “Add new LP” window and “LP Default Transactions Account” Field. However, it’s more practically used in the “Jumper” mode where each account in VertexFX needs to be mapped as is in the LP non-Vertex API based platform.

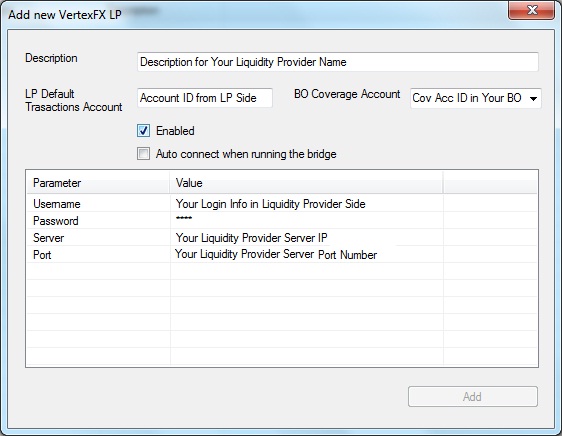
Add new VertexFX 10.2 LP/VertexFX 10.1LP:

- Description: Type LP name or brief description.
- LP Default Transactions Account: Insert a valid LP Account ID (the account that your orders will be covered in)
- BO Coverage Account (Optional): Insert a valid account ID which is located on your VertexFX system, which should be of type coverage account. The purpose of this account is to mirror all orders covered with LP account/s in your VertexFX BackOffice floating status screen. This field is optional but recommended, which you can add separated coverage account for each LP account or use the same coverage account for all LPs.
- Enable Check box: Tick the check box to enable (activate) this LP account and start covering your orders on it. The bridge will always cover with LP has the best price between all connected and enabled LPs.
- LP parameters list: The needed configuration data for this specific LP, which are different between LP type to another. For VertexFX LPs, you have to set username, password, server IP, and server port for this LP.
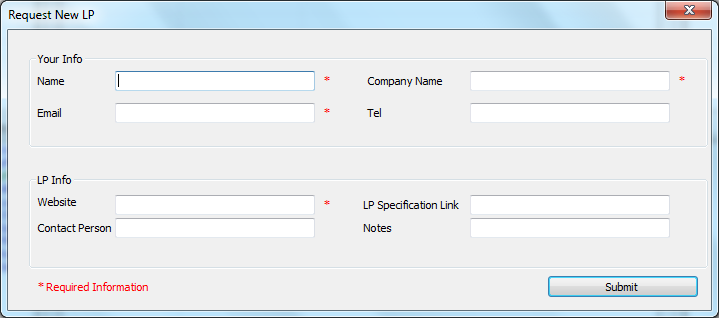
Request New LP:
New window will be opened to befilled with yourpersonal information, when press Submit it sends a request tothe sales department to connect you with liquidity provider.

Remove:
To remove LP account.
You can check the contact info for theVertexFX regulated Brokers as liquidiy provider if you click on “Contact LP’s for opening account“
See Also